Development Environment Setup Guide (E-Commerce-Backend)

Introduction

This guide will walk you through setting up your development environment, configuring environment variables, and registering an admin user for your application. It also includes deployment instructions for Render and links to additional resources.

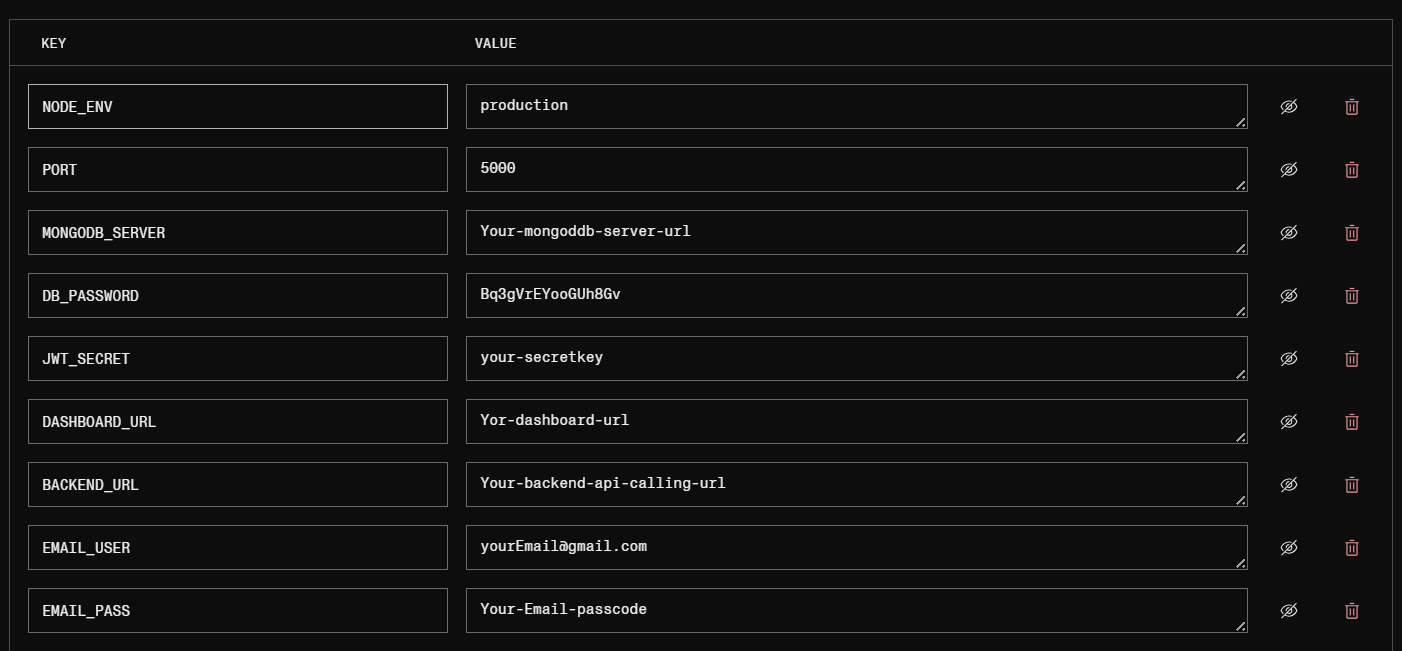
Setting Up Environment Variables

1Create a .env File

In your project's root directory, create a new file named .env

Note: The .env file should never be committed to version control. Make sure to add it to your .gitignore file.

2Configure Environment Variables

Add the following configuration to your .env file:

NODE_ENV=development
PORT=5000
MONGODB_URI=mongodb+srv://your_username:your_password@cluster0.xxxxx.mongodb.net/your_database?retryWrites=true&w=majority
DB_PASSWORD=your_mongodb_password
JWT_SECRET=secretkey
Important Configuration Instructions:
  • MONGODB_URI: Replace with your actual MongoDB Atlas connection string

    You can find your connection string in MongoDB Atlas:

    1. Go to your Cluster dashboard
    2. Click "Connect" button
    3. Select "Connect your application"
    4. Copy the connection string
    MongoDB Atlas connection string location

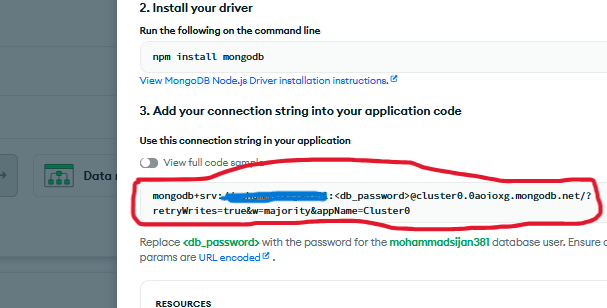
    Example: Where to find your MongoDB connection string in Atlas

  • DB_PASSWORD: Use your actual MongoDB user password (not your Atlas account password)

    This is the password you created when setting up database access:

    MongoDB user password setup

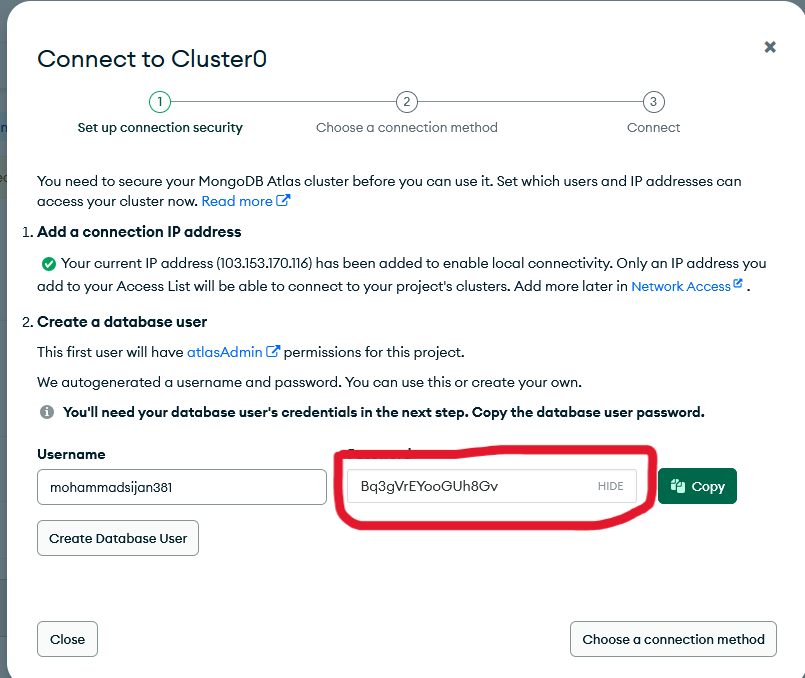
    Example: Database user password setup in MongoDB Atlas

  • Keep this file secure and never share it publicly
  • These values are examples - use your actual credentials
Complete Example .env File:
NODE_ENV=development
PORT=5000
MONGODB_URI=mongodb+srv://devuser:SecurePass123@cluster0.0aoioxg.mongodb.net/myappdb?retryWrites=true&w=majority
DB_PASSWORD=SecurePass123

Note how the password appears in both MONGODB_URI and DB_PASSWORD in this example.

3Create a MongoDB Cluster (If You Don't Have One)

If you don't already have a MongoDB Atlas cluster set up, follow our comprehensive guide:

View MongoDB Atlas Setup Guide
Key Requirements:
  • Create a free M0 cluster (perfect for development)
  • Set up a database user (different from your Atlas account)
  • Whitelist your IP address (or allow access from anywhere for development)
Important: You'll need these two things from MongoDB Atlas for your server setup:
Connection string Database credentials

4Set Up Your Development Environment

Open Project in VS Code

  1. Launch Visual Studio Code
  2. Click "File" → "Open Folder"
  3. Select your backend project folder

Install Node.js (If Not Already Installed)

  1. Check if Node.js is installed by running in terminal:
    node -v
  2. If not installed, download and install from: https://nodejs.org/ (LTS version recommended)

Install Dependencies

  1. Open the terminal in VS Code (Ctrl+` or Terminal → New Terminal)
  2. Run the following command to install all required packages:
    npm install
  3. Wait for all dependencies to be installed
Note: If you encounter any errors during installation:
  • Make sure you have a stable internet connection
  • Try running as administrator if you're on Windows
  • Check the error message for specific package issues

Registering an Admin User

1Start Your Application

Run your Node.js application with the configured environment variables:

node Server.js

2Register Admin User via API

Send a POST request to the following endpoint to register an admin user:

Endpoint: http://localhost:5000/api/admin/register

Method: POST

Headers:

Content-Type: application/json

Request Body (JSON):

{
  "userName": "admin",
  "password": "admin",
  "email": "admin@gmail.com"
}
Important Login Information:
  • You will need this username and password to access the admin dashboard
  • The email must be valid as it will be used for:
    • Password reset requests
    • Account recovery
    • Important system notifications
    • Add the BACKEND_URL after backend deployment
    • You will get EMAIL_PASS in your email setting passcode
  • For security reasons, change the default credentials after first login

3Making the Request

You can make this request using Hoppscotch:

Using Hoppscotch:

  1. Open Hoppscotch in your browser
  2. Set the request method to POST
  3. Enter the URL: http://localhost:5000/api/admin/register
  4. Go to the Headers tab and add: Content-Type: application/json
  5. Go to the Body tab, select "JSON", and paste the request body above
  6. Click "Send"
Hoppscotch request example

4Expected Response

On successful registration, you should receive a response similar to:

{
  "message": "Admin created successfully",
  "token": "eyJhbGciOiJIUzI1NiIsInR5cCI6IkpXVCJ9...",
  "admin": {
    "id": "68a0319b8774739f868b679a",
    "userName": "YourUserName",
    "email": "YourEmail@gmail.com"
  }
}
Success! You've now:
  • Set up your development environment
  • Registered an admin user
  • Can now login to the dashboard using the credentials you provided
After Registration:
  1. Access the admin dashboard at http://localhost:5000/admin
  2. Use your registered username and password to login
  3. Change your default password immediately for security

Deploying to Render

1Create a Render Account

  1. Go to Render.com
  2. Sign up for a free account
  3. Verify your email address

2Create a New Web Service

  1. From your Render dashboard, click "New" and select "Web Service"
  2. Connect your GitHub/GitLab/Bitbucket account
  3. Select your e-commerce backend repository
  4. Choose the branch you want to deploy (usually main/master)
Render new web service

3Configure Your Web Service

  1. Give your service a name (e.g., "ecommerce-backend")
  2. Select "Node" as the runtime
  3. Choose the region closest to your users
  4. Select the free plan (or upgrade for production)
  5. Set the build command: npm install
  6. Set the start command: node Server.js
Render service configuration

4Set Up Environment Variables in Render

  1. In the Render dashboard, go to your web service
  2. Click on "Environment" in the left sidebar
  3. Click "Add Environment Variable"
  4. Add each variable from your .env file one by one:
    • NODE_ENV
    • PORT
    • MONGODB_URI
    • DB_PASSWORD
    • JWT_SECRET
    • DASHBOARD_URL
    • BACKEND_URL
    • EMAIL_USER
    • EMAIL_PASS
Important: For production, you should:
  • Use a stronger JWT_SECRET
  • Set NODE_ENV to "production"
  • Consider using Render's secret files for sensitive data
Render environment variables

5Deploy Your Application

  1. Click "Create Web Service" at the bottom of the configuration page
  2. Render will automatically:
    • Pull your code from GitHub
    • Install dependencies
    • Start your application
  3. Monitor the logs to ensure successful deployment
  4. Once deployed, you'll get a URL like: https://your-service-name.onrender.com
Deployment Complete! Your e-commerce backend is now live on Render.

Troubleshooting

Common Issues

Important Note About Image Storage

Ephemeral Storage on Render

When hosting your backend on Render's free tier, please be aware that:

Permanent Storage Solutions

For permanent image storage, you need to integrate with a cloud storage provider:

1Recommended Cloud Storage Options

  • Amazon S3 (Most reliable, requires AWS account)
  • Google Cloud Storage (GCP alternative)
  • Cloudinary (Image-focused, free tier available)
  • Firebase Storage (Easy integration with Firebase projects)

2Implementation Guide

To implement cloud storage:

  1. Create an account with your chosen provider
  2. Set up a storage bucket/container
  3. Add required credentials to your .env file:
    # Example for AWS S3
    AWS_ACCESS_KEY_ID=your_access_key
    AWS_SECRET_ACCESS_KEY=your_secret_key
    AWS_REGION=your_region
    AWS_BUCKET_NAME=your_bucket_name
  4. Modify your image upload logic to save to cloud storage instead of local disk
  5. Update your API to return cloud storage URLs instead of local paths
Note: We provide a detailed cloud storage integration guide in our advanced documentation. View Cloud Storage Guide